Setup Instructions for LED Par Can Stage Light
This page provides instructions on how to set up the LED par can Stage Light.
LED Par Can Stage Light Overview
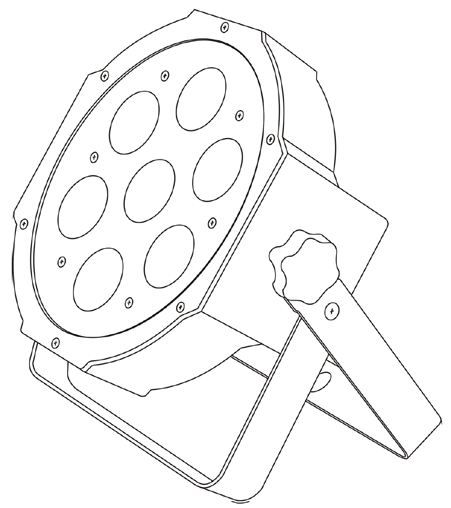
1. Fixture Parts
-
1 x MFL brand light OR Unbranded light LED Flat Par Can Light
-
1 x Power Cable
2. Safety Precautions
-
Voltage: Check the power supply’s voltage to match the unit’s required voltage (AC100-240V, 50/60Hz).
-
Environment: Operate the fixture in a well-ventilated area and avoid placing it in a humid, excessively hot, or dusty environment.
-
Handling: Do not operate the fixture with wet hands. Disconnect from the power supply before servicing or cleaning. DO NOT stand close to the fixture and stare directly into the LED light source.
- Warning: In the event of a spillage, disconnect the power and allow the unit to dry out naturally. Qualified personnel should then check the unit before continuing use.
-
Installation: Mount the unit securely on a stable surface or rigging point to prevent it from falling.
- Cleaning: Regularly clean the lens and exterior with a soft, dry cloth. Do not use solvents or abrasive cleaners.
3. Place or Mount the Light
- Surface: Simply place the light bar on the floor (solid surface) in the desired location.
- Hang it: Use the bracket/clamp to hang the light bar on a T-bar, truss, or any suitable overhead structure (bracket/clamp not included)
4. Ideal Uses
- Parties: Halloween, Christmas, Birthdays, Weddings, Karaoke, themed parties.
- Entertainment Venues: Bars, clubs, discos, and KTV rooms.
- Art and Displays: Galleries, museums, art studios.
- Fitness Spaces: Gyms, yoga studios, and more.
- Stage Lighting: Create stunning visual effects for performances.
- Accent Wall at Home (kids, entertainment room, patio, etc): temporarily change an accent wall colour. Mix two or more lights to create a colour transition. Use effects (gradient, fade, strobe, colour change) to create a dynamic accent wall.
5. Setup Instructions
-
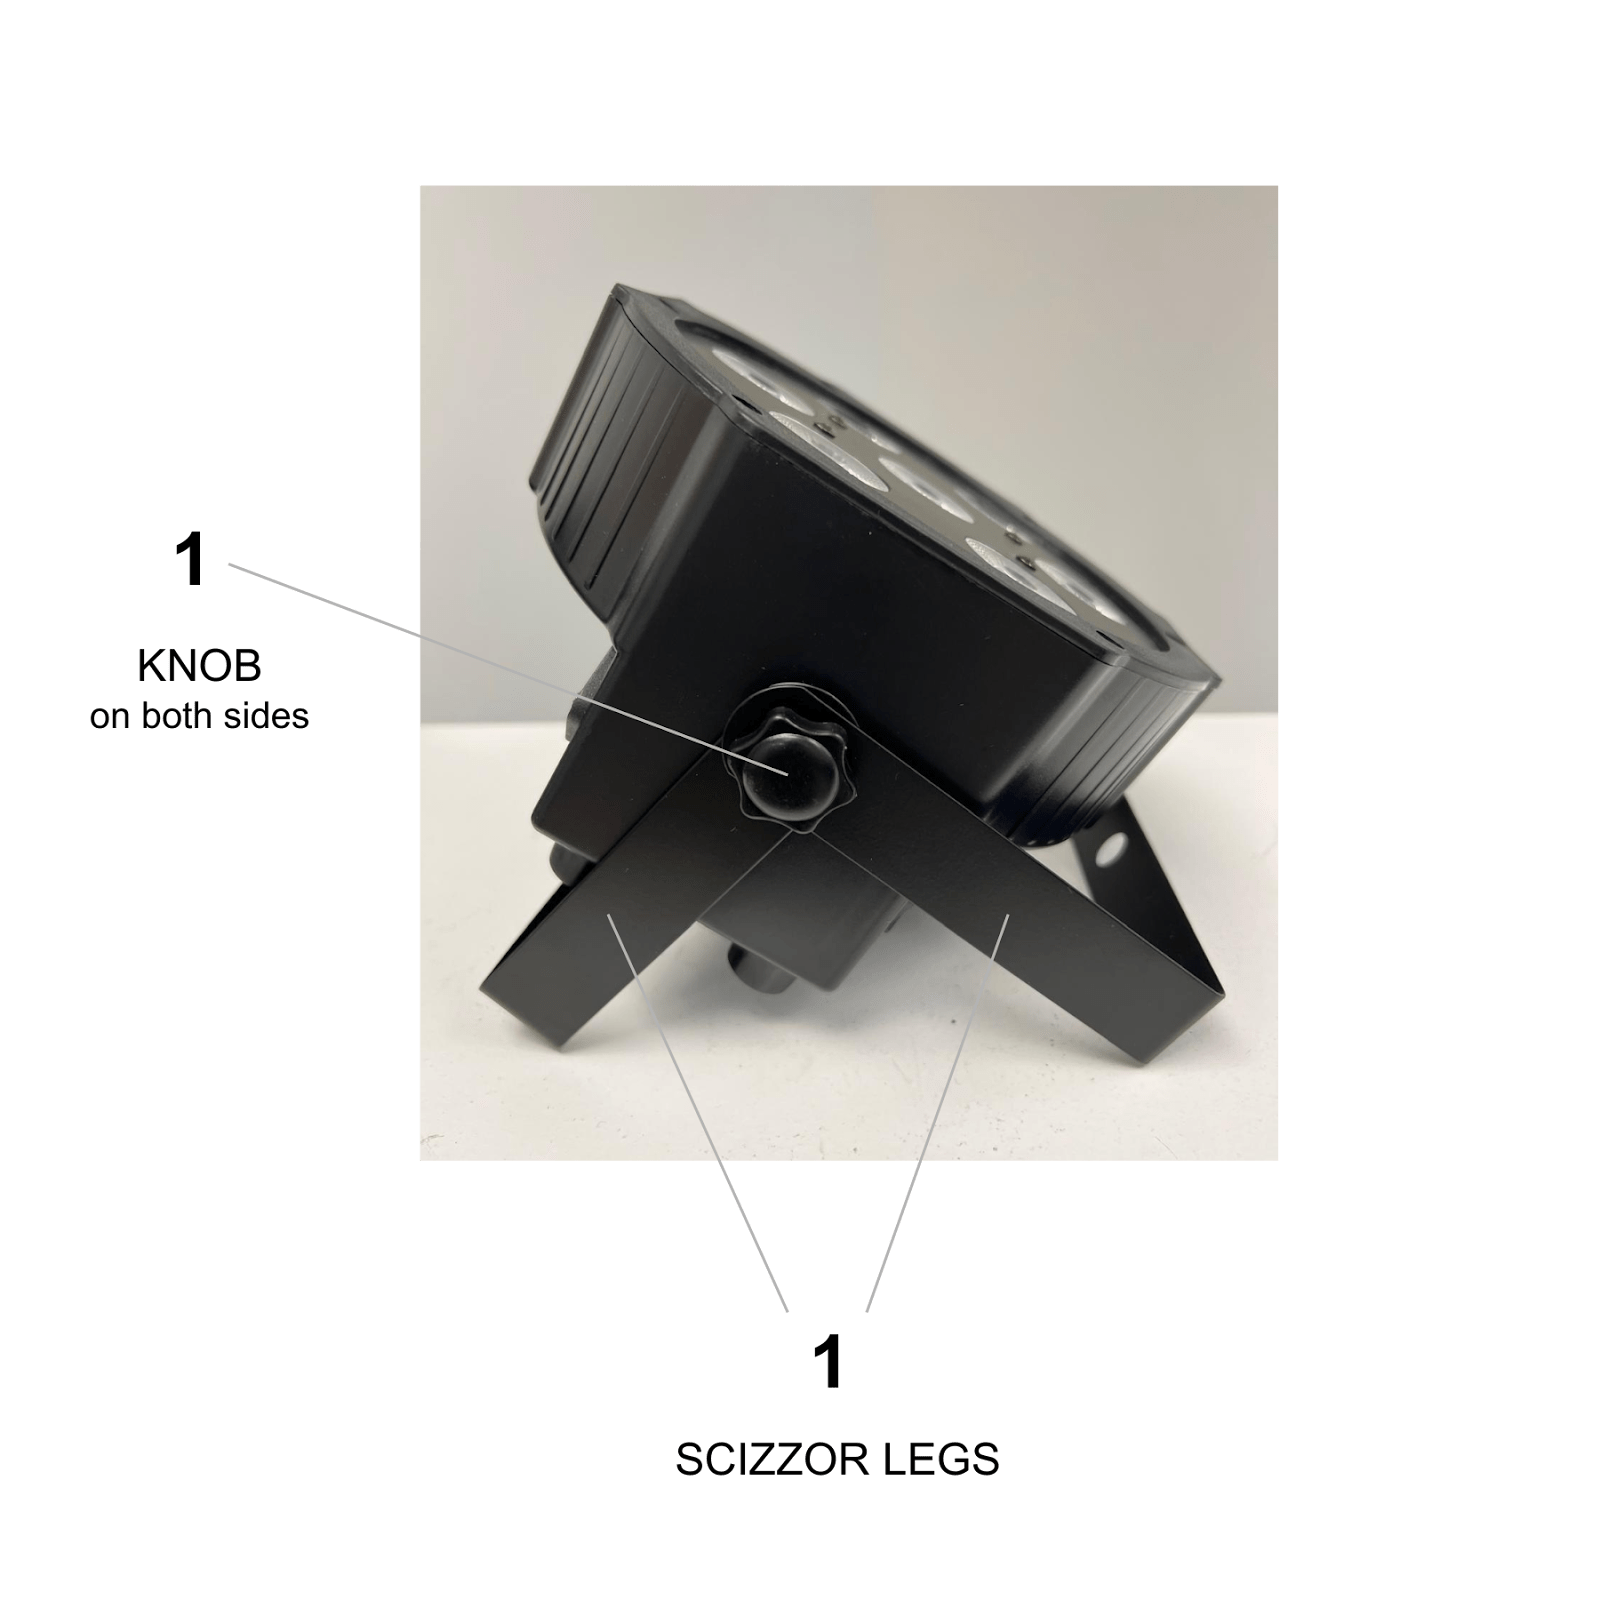
- Scissor Legs: Loosen the knobs on the side of the scissor stand to open the legs apart. Once the legs are in place, tighten the knobs to secure them.
- Power Connection: Connect the power cable to the light and a power outlet.
The fixture will start in its default mode or the last selected Mode.
6. Control Panel Functions
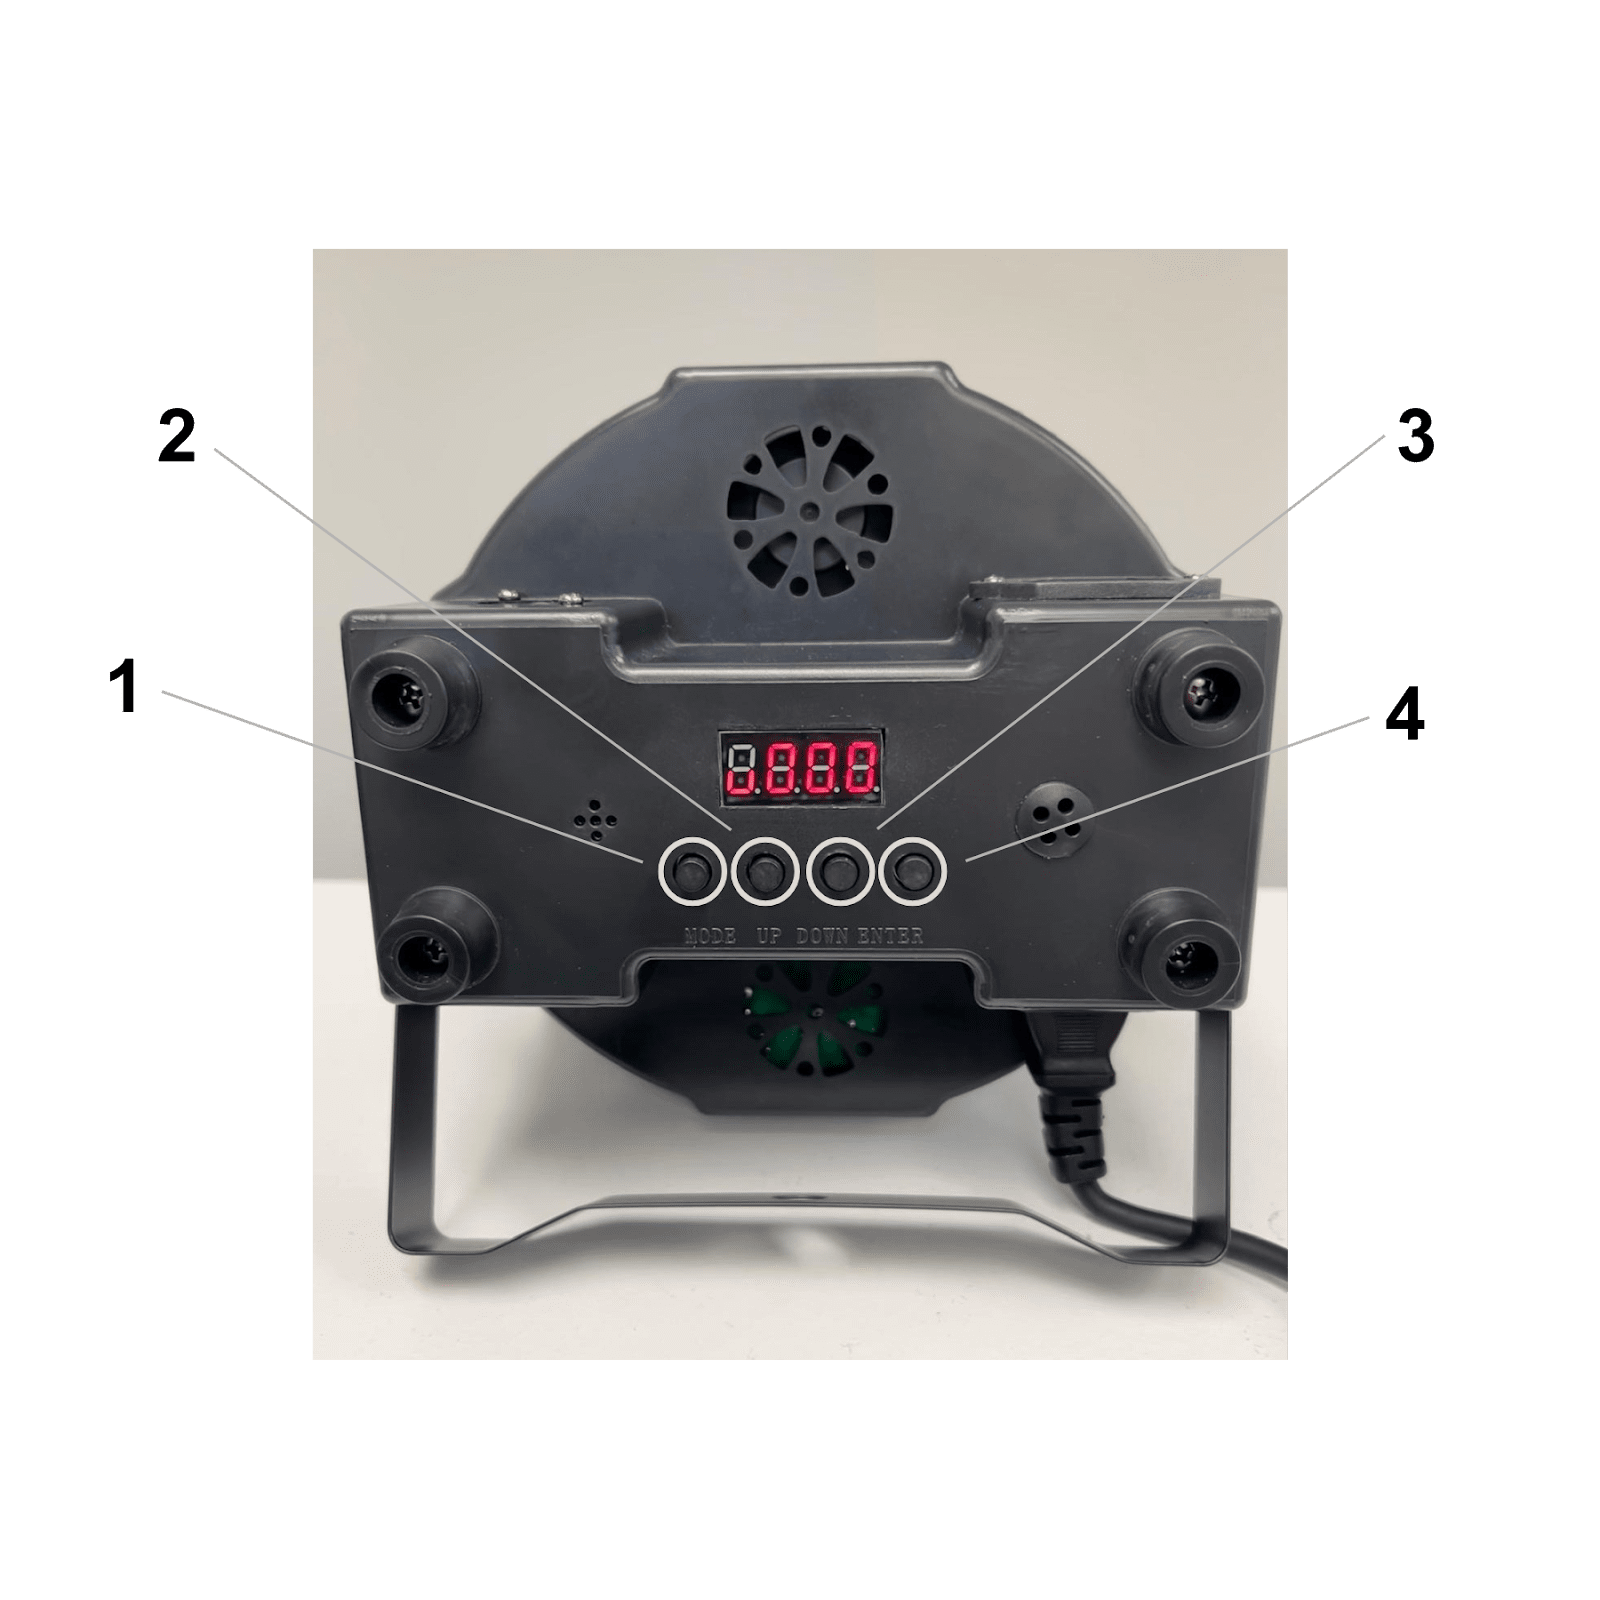
Four touch buttons are under the LED Alpha-numerical display: Mode, Down, Up, and Enter
- MODE: Navigate through the menu selection or return to the previous menu
- UP: Press [UP] through the menu list to increase/change the value of the current function.
- DOWN: Press [DOWN] through the menu list to increase/change the value of the current function.
- ENTER: Confirm and save settings.
Display Menu instructions to set the operation MODES – (MFL brand light)
Table 1
| MODE | FUNCTION |
| A001 – A512 | DMX mode: select channel 1—channel 512 |
| ADYE | ADNO AUXX Open or Close |
| AUXX | AU01~AU08 Color Choose |
| FF00 | Colourful change(FF00—-FF99) up and down keys to modify the transition speed |
| EE00 | Colourful Fade(dE00——dE99) up and down keys to modify the transition speed |
| CC00 | Blasting flash (CC00——CC99) up and down keys to modify the transition speed |
| FF00 | FF00—-FF99 Strobe, speed from slow to fast |
| SOUD | Sound Strobe Effect |
| SUND | Sound Strobe Effect |
| R000 | R001—R255 Red bright from weak to strong |
| G000 | G001—-G255 Green bright from weak to strong |
| B000 | B001—-B255 Blue bright from weak to strong |
| W000 | W001—-W255 White bright from weak to strong |
How to use MODE functions from Table 1
Preset colour – AUXX
- Select AU01-AU08 for a preset colour (eight colour options)
Colour Change – FF00
- Press MODE to get to FF00 – press the UP or DOWN button to select the value.
- Select from 00-99 to select colourful jump change, slow to fast.
Colour Gradual Change – EE00
- Press MODE to get to EE00 – press the UP or DOWN button to select the value.
- Select from 00-99 to select gradual colour change, slow to fast.
Colour Flash – CC00
- Press MODE to get to EE00 – press the UP or DOWN button to select the value.
- Select from 00-99 to select gradual colour change, slow to fast.
STROBE Modes – F000
- Press MODE to get to F000 – press UP or DOWN button to select the value.
- F001 to F009 are static MODES, 010-255 are strobe modes, slow to fast speed
Sound Strobe Colour Change – SOUD
-
- Press MODE to get to SOUDYou can play music or clap/make noise. It works best with lots of base and beat sounds.
- Not Responding to Sound: The light might not pick up quiet or high-pitched sounds.
Sound Control Colour Change – SUND
-
- Press MODE to get to SUND. You can play music or clap/make noise. It works best with lots of base and beat sounds.
- Not Responding to Sound: The light might not pick up quiet or high-pitched sounds.
To select a desired STATIC or STROBE Mode with a Custom (AUXX) or Preset colour (r255-G255-b255-u255):
- Preset colour:
-
-
- First, select STROBE Mode F000. F001 to F009 are static MODES, and 010-255 are strobe modes, slow to fast speed.
- Then select CL01-CL08 for a static colour (eight colour options)
-
- Custom colour
-
-
- First, select r255-G255-b255-u255 values from 000-255 to achieve the desired colour mix/intensity, and select ENTER after each selected value.
-
- EX. Custom colour: Turquios r000-G255-b100-u000
-
- Then select STROBE Mode F000. F001 to F009 are static MODES, and 010-255 are strobe modes, slow to fast speed.
Display Menu instructions to set the operation MODES – (Unbranded lights)
Table 2
| No | MODE | VALUE | FUNCTION |
| 1 | A001 | A001 001-512 | DMX512 – 8-channel address code setting |
| 2 | d001 | 001-512 | DMX512 – 4-channel address code setting |
| 3 | r255 | 000 – 255 | Red Dimmer- Dark to Bright |
| 4 | G255 | 000 – 255 | Green Dimmer- Dark to Bright |
| 5 | b255 | 000 – 255 | Blue Dimmer- Dark to Bright |
| 6 | u255 | 000 – 255 | White Dimmer- Dark to Bright |
| 7 | F255 | 000 – 255 | 001-004 for Static Light Mode
005-255 start to strobe, speed from slow to fast |
| 8 | CL01 | 01-08 | Eight preset colour outputs |
| 9 | CC15 | 00 – 15 | Colourful jump change, slow to fast |
| 10 | DE15 | 00 – 15 | Colourful gradual change, slow to fast |
| 11 | CP15 | 00 – 15 | Colourful pulse change, slow to fast |
| 12 | Sound | / | Sound control changes colours |
How to use MODE functions from Table 2
STROBE Modes – F255
- Press MODE, to get to F000 – press UP or DOWN button to select the value.
- F001 to F004 are static MODES, 005-255 are strobe modes, slow to fast speed
To select a desired STATIC or STROBE Mode with a Custom (CL01) or Preset colour (r255-G255-b255-u255):
- Preset colour:
-
- First, select STROBE Mode F255. F001 to F004 are Static MODES, and 005-255 are Strobe modes, slow to fast speed.
- Then select CL01-CL08 for a static colour (eight colour options)
- Custom colour
-
-
- First, select r255-G255-b255-u255 values from 000-255 to achieve the desired colour mix/intensity, and select ENTER after each selected value.
-
- EX. Custom colour: Turquios r000-G255-b100-u000
-
- Then select STROBE Mode F255. F001 to F004 are Static MODES, and 005-255 are Strobe modes, slow to fast speed.
Preset colour – CL01
- Select CL01-CL08 for a preset colour (eight colour options)
Colour Change – CC00
- Press MODE to get to CC00 – press the UP or DOWN button to select the value.
- Select from 01-15 to select colourful jump change, slow to fast.
Colour Gradual Change – DE00
- Press MODE to get to DE00 – press the UP or DOWN button to select the value.
- Select from 01-15 to select gradual colour change, slow to fast.
Colour Pulse – CP00
- Press MODE to get to CP00 – press the UP or DOWN button to select the value.
- Select from 01-15 to select colourful pulse change, slow to fast.
Sound Control Colour Change – Soud
-
- Press MODE to get to Soud – play music or clap/make noise. It works best with lots of base and beat sounds.
- Not Responding to Sound: The light might not pick up quiet or high-pitched sounds.
If you need more help with other equipment setup, check the User Guide Hub


